In most homes, people use the garage door opener than the front door itself. And, chain drive models are still a highly popular choice because they are dependable, budget-friendly, and were manufactured to last for years.
Like any moving component, though, the chain needs attention and periodic maintenance. Maintenance is key to a quieter and durable system. When the chain starts to sag, you’ll notice a new, strange noise and uneven movement. And, worst-case scenario, your door simply won’t close adequately.
This easy-to-follow garage door chain guide will show you how to tighten a garage door chain, why it’s so important to do it to restore its functioning, and when it’s time to call a professional.
Quick 3 Step Snippet
- Disconnect the power and release the trolley with the emergency cord.
- On the trolley, tighten the external nut to tighten a loose garage door opener chain until the chain sits about ¼ inch above the rail’s base at the midpoint.
- Reconnect the opener, cycle the door, and adjust further if the loose sagging chain persists.

Signs Your Garage Door Chain Needs Tightening
A garage door chain doesn’t loosen all of a sudden; it stretches slowly over months because of daily use. Initially, you’ll hear a faint rattle which soon becomes louder.
Here are the signs that suggest a sagging chain garage door opener:
- Unusual noise: When the chain is slack, it will most likely slap against the rail. This produces a sound that sometimes even shakes the opener’s light cover, and you may even hear the vibrations through walls and ceilings. If you are concerned about this noise, take a look at the common causes for noisy garage doors on our site.
- Erratic or uneven movement: A sagging chain can slip on the sprocket, making it stutter every time it opens or closes.
- The door doesn’t close completely: You may see that the door may stop short or hang unevenly, leaving a gap at the bottom.
- Visible droop: After closing the door, look at the rail. If the chain dips more than half an inch at the midpoint, this means it’s too loose and it probably needs an adjustment.
The reasons behind these issues are typically daily wear or temperature changes. But if you catch them on time, you can correct chain tension before it damages the sprocket, motor, or other components.
Addressing chain tension early saves you from bigger repairs later. If you’re wondering how to adjust things beyond basic tightening, the next section explains how.
Chain Tightening Before: Safety, Tools, and Proper Tension Guidelines
Working with an opener isn’t complicated, but it does require care. Before you grab a wrench to tighten the chain, you need to take precautions. These safety basics will keep you safe and make the task easier:
- Unplug the opener before you start working on the chain.
- Keep the door closed while making any adjustments. This relieves stress on the system.
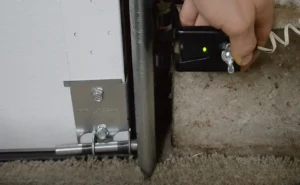
- Release the trolley. Pull the red emergency cord to disconnect the opener from the door.
- Avoid springs and cables. These parts are under extreme tension and can be dangerous if not handled properly. Let professionals handle this.
- Don’t use power tools. A socket wrench suffices. Drills or impact drivers might tighten a loose chain too much and damage parts.
Tools You’ll Need

- Two 7/16inch wrenches (or a small adjustable wrench)
- A sturdy ladder
- A ruler or tape measure
- Locking pliers or vise grips (to stop the chain from twisting)
- A flashlight and a rag to have a clean and clear workspace.
Proper Chain Tension
Now, let’s talk about garage door chain adjustment and garage door chain tension. Each brand has its own specifications, but they share a common range. Bear in mind that getting the correct chain tension is an important factor. If the chain is too loose, the opener will make short, sharp sounds, and if it’s too tight, it will add needless strain on the motor and sprockets.
Check some manufacturers’ guidelines and general best practices in the table below:
| Model / Situation | Recommended Clearance at Mid-Point (Door Closed) | Notes & Source |
| Chamberlain / LiftMaster (TRail) | ½ inch above rail base | Official Chamberlain Group Support |
| Chamberlain / LiftMaster (Square Rail) | ¼ inch above rail base | Official Chamberlain Group Support (Square Rail) |
| Genie- Chain/Belt Drive | ¼ inch from the bottom of the rail (opposite to the turnbuckle) | Genie Replacement Chain Rail Instructions |
| General Guidance | ½–¾ inch above the base of the rail – | It should be snug but not too tight. |
Reminder: if you tighten a loose chain too tightly, it will put stress on the motor and sprocket. On the other side, leaving it too slack will result in noise and the risk of skipping teeth. The goal is to achieve a smooth movement without visible sag.
Before going hands-on, check the following:
- Is the power off?
- Is the door closed?
- Is the trolley released?
- Do you have your tools handy?
Once you’ve checked these items, you’re set to go.

How to Tighten a Garage Door Chain: Step-by-Step Procedure
Adjusting a garage door chain isn’t complicated; it just requires patience.
If you wonder how to tighten garage door chain correctly, follow these nine short steps and learn how to adjust a chaindrive opener safely, follow these nine short steps:
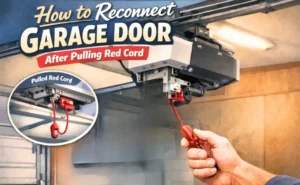
Step 1: Disconnect power and disengage the door. Unplug the opener and pull the red release cord. This prevents the door from moving unexpectedly.
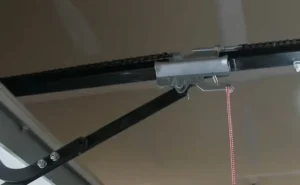
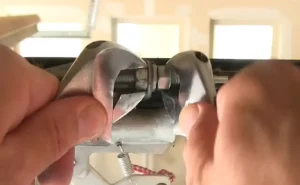
Step 2: Find the adjustment mechanism. Seek along the rail for the threaded rod with two nuts (inner and outer). This is where you’ll make changes.
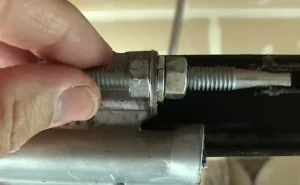
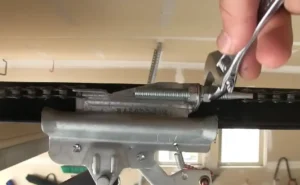
Step 3: Hold the internal nut steadily. Use one wrench to keep it in place.

Step 4: Turn the outer nut. With your second wrench, rotate it clockwise to tighten the chain. Do it slowly; only 2 or 3 rotations at a time.
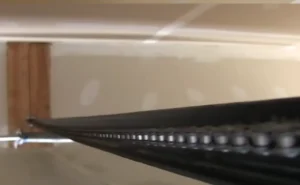
Step 5: Check the tension of the chain. After each adjustment you make, measure the sag at the midpoint of the rail. The chain should hover about ¼ inch above the base.
Step 6: Fix slipping issues. If your garage door chain is slipping off the sprocket, it may have skipped a tooth. One of the most common causes of a garage door chain slipping is a worn sprocket. Loosen slightly, put the chain back in position, and tighten again.
Step 7: Prevent twisting. Use locking pliers or vise grips on the turnbuckle so the chain stays straight as you tighten. If a chain is twisted, this can shorten its lifespan.
Step 8: Reconnect power and re-engage the trolley. Plug the opener back in and reset the red cord so the door and opener move together again.
Step 9: Test the door. Run a full open and close cycle. If you still hear rattling or see a loose, sagging chain, make new small adjustments until everything looks and sounds right.
Image Credit: “How to tighten a loose sagging Chain – Garage Door Opener repair” by “AdamDIY” Video.
Alternative method (no adjustment screw): Not all openers have a visible tension screw. If yours doesn’t, you can still take up the slack. Loosen the turnbuckle slightly, move the connecting link at the trolley or sprocket to shorten the chain, and then snug the turnbuckle back down. When you’re done, check the sag at the middle of the rail; the chain should sit within the suggested range before you reconnect the opener.
Pro Tip: It’s always safer to leave the chain a bit looser than over-tightening it. A little slack prevents avoidable strain on the motor and sprocket. This also extends the opener’s life. Moreover, it can also solve the problem that sometimes the garage door does not open completely on one side.
Garage Door Chain Maintenance: Model Notes, Problem Solving, and Lubrication
Tightening the chain is only a chapter of the story. To keep your opener working at its best, you’ll have to perform some regular upkeep.
Lubrication
A dry chain will grind and squeal. On the other hand, excessive grease attracts dirt and dust that gum up the links. Lubricating the chain is absolutely necessary to keep friction low.
The best way to go is to apply a thin layer of garage door chain lubrication every six months. Prefer white lithium grease, as it clings to metal without dripping. Simply spray or brush a thin coat and wipe away any excess. Avoid WD-40 or heavy oils; they attract dirt and grime. We have a detailed guide on lubricants that explains how to properly lubricate your garage door.
Seasonal maintenance
Even if you take great care, your chain won’t last forever. The typical lifespan of a chain is 10 to 15 years. If you find stiff links, rust, or your chain keeps loosening, although you have adjusted it many times, it may be time for garage door chain replacement.
Along with garage door chain replacement, you also need to know about the two important components of a garage door: the garage door roller replacement procedure and how to replace a garage door panel if you want to DIY these things. Knowing these things will put you several times ahead of other homeowners.
However, sometimes it is not easy to do it yourself, in such cases you can call Northside Garage Door Systems. We are always here to solve your problems.
Common mistakes to avoid
- Over-tightening the chain. If you tighten a chain excessively, you’ll be putting strain on the motor.
- Neglecting safety steps (such as unplugging the opener).
- Using the wrong lubricant (heavy oils or WD 40 instead of white lithium grease).
- Ignoring alignment. If the chain has jumped teeth, tightening won’t fix it until you re-seat it.
- Forgetting the basics. If you have doubts about how to tighten a garage door chain, review the nine steps we described above before turning a wrench.

When to Repair vs. Replace the Chain or When to Call a Pro
Not all issues can be fixed with tightening. Here are scenarios where professional garage door chain repair makes more sense:
- The chain loosens again within days of adjustment.
- Links are visibly damaged or rusted.
- The turnbuckle is bent or stripped and won’t hold tension.
- You hear grinding even after adjusting and garage door chain lubrication.
In these cases, forcing DIY repairs can damage the motor or rail. Northside Garage Door Systems offers expert repair and replacement services, ensuring parts are installed safely and backed by a warranty.
Northside Garage Door Systems counts on a professional team specialized in diagnosing, repairing, or changing garage doors. Backed up with long expertise and using only quality materials.
Get Expert Garage Door Repair Today!!!
Don’t risk costly damage with DIY fixes. Trust Northside Garage Door Systems for professional, warrantied repairs. Call us or schedule online today.
If you’ve noticed recurrent issues, don’t wait until it’s too late and the damage extends to other components. Book a service with us through our online contact form or call us at 317-575-0983. Acting early saves time, headaches, and avoids bigger bills later.
Frequently Asked Questions
What tools do I need?
At minimum, two wrenches, a ladder, and a ruler. Locking pliers are recommended to hold the turnbuckle steady.
How do you tighten the chain on a garage door opener?
Unplug the opener, disengage the trolley, and use the twonut system to tighten a chain garage door opener drive. Test chain sag as you go until you achieve proper clearance. If you need a refresher on how to tighten a garage door chain, revisit the step-by-step section above.
Do garage door chains need to be tightened?
Yes. Over time, every chain stretches. Depending on use, most need adjustment every two to three years. Frequent cycling or extreme weather may require more frequent checks.
How to tell if a garage door chain is too loose?
If you see a loose sagging chain, hear slapping, or notice jerky movement, the chain is too slack. A clearance greater than half an inch at midspan is a clear sign.
Do you adjust with the door open or closed?
Always adjust with the door closed. This relieves tension on the opener and ensures the most accurate reading of sag.
Conclusion
Regular chain care means smoother, quieter, and safer operation. From spotting early signs like rattling or a sagging chain garage door opener to using the right tools for safe adjustments, you now have a complete guide to keeping your system in top shape.
Routine garage door chain lubrication and inspections prevent problems, while timely adjustments protect the motor and sprockets from premature wear.
When issues go beyond tightening, professionals are only a call away. Northside Garage Door Systems can handle everything from garage door chain repair to full opener replacement, ensuring reliable service for years to come.
For a customized response and solution to your problem, feel free to call us at 317-575-0983 or reach out by filling up our book now form.
Whether your goal is reducing noise, improving safety, or extending the life of your opener, knowing how to tighten a garage door chain gives you confidence and keeps your garage door running smoothly.