Have you been looking into garage door repair methods? Then you’ve possibly understood that worn or damaged rollers can severely affect the door’s functioning. Learning how to replace garage door rollers is a simple and real way to prolong your garage door’s lifecycle and ensure a flawless operation. A door that doesn’t roll appropriately will eventually become noisy, unbalanced, and even unsafe in the near future. But if you have the know-how (or if you don’t have it just follow a tutorial like this one), you can do this project yourself, at home and save yourself from the frustration of a malfunctioning door.
In this wide-ranging guide, we’ll see why rollers do matter a lot, signs you must look for that indicate they need replacement, and the step-by-step process to do the job safely. You’ll also learn the most common mistakes you should avoid, the costs involved, and when it’s time to call in a professional. Continue reading, take notes, and by the end, you’ll be able to handle roller replacements like a pro—ensuring your garage door runs properly for a long time.

If you have a garage door, you most likely know what garage door rollers: those small wheels that guide your door along the metal tracks when you open or close it. Typically, they are made of steel, nylon, or an amalgamation of materials (for example, nylon-coated steel). These rollers carry a lot of weight, particularly if your door is made of heavy steel or wood. These tiny wheels are constantly interacting with the track, withstanding the door’s load every time it’s raised or lowered.
Nothing lasts forever, not even top-quality rollers. The continuous friction and weight sooner or later wear down the bearings or surfaces of each roller. In many cases, neglected rollers can contribute to misalignment, uneven door travel, and that dreaded screeching noise as your door moves. If you keep your rollers in good condition or know exactly how to replace garage door rollers when they start showing signs of failure, you’ll be able to keep your garage door working safely.
Types of Garage Door Rollers
Before moving to the next topic, it’s worth briefly mentioning the different types of garage door rollers available.

- Steel Garage Door Rollers: These are highly durable and strong, but generally noisier. They usually require regular lubrication to lessen friction and minimize sound.
- Nylon Garage Door Rollers: These are quieter and smoother while operating. They often include sealed bearings that necessitates little maintenance.
- Plastic Garage Door Rollers: You’ll find these rollers on older or budget-friendly doors. They wear out more quickly and can be quite noisy.
If you are thinking of a replacement, it’s crucial to bear in mind your door’s weight, how frequently you use it, and how quiet or silent you want the door to be. If your budget allows it, we suggest investing in high-quality rollers; this can save you from replacing them prematurely.
5 Signs You Need to Replace Garage Door Rollers
The crucial fact is realizing if you really need to replace your garage door rollers or postpone it. Let’s overview the signs that indicate a replacement might be necessary.
1. Excessive Noise
If your door squeaks or grinds stridently each time it moves, the rollers could be the underlying reason. Damaged or rusty rollers generate friction that renders into irritating sounds. While occasional noise can be fixed by applying a lubricant, persistent racket usually indicates there are major issues.
There are other reasons why your garage door may be making noise that actually indicate a problem. We have a guide post on this topic where we have listed the common causes of garage door noise and possible solutions, which you can check out if you want.
2. Visible Wear or Cracks
With long-term usage, rollers may develop cracks in their wheels, or the bearings might start to loosen. If you spot any chips, flat spots, or wobbling in the roller wheel, it’s probably time for a replacement.
3. Uneven Door Movement
A door that seems to tilt or shudder mid-travel might have one or more failing rollers. When rollers don’t move smoothly, sections of the door can lag behind or lurch forward, causing alignment problems.
4. Frequent Jamming
Does your garage door occasionally get stuck halfway when opening or closing it? Or does the garage door not close completely on one side? This could be caused by damaged rollers preventing correct move along the tracks. In severe cases, you’ll have to guide the door manually or reset the opener’s sensor. Instead of repeatedly forcing it, you’ll likely need to change the garage door rollers.
5. Vibrations or Shaking
Minor vibrations can be normal, but noticeable shaking is generally linked to damaged rollers. If the door shakes and gets to rattle items in your garage, the rollers (or their track alignment), make an immediate inspection.
Knowing these warning signs ensures you don’t overlook critical issues until they turn into severe issues that require costly repairs. Doing regular checks will play a fundamental role in maintaining the door’s safety and functionality. If you spot one or more of these red-flags, it might be the moment to learn how to replace garage door rollers, roll your sleeves, and go hands-on before damage gets worse.
Tools and Materials Needed
Gathering the correct garage door tools and materials before you start will optimize the entire replacement process. Take note on what you’ll need:
- Replacement Rollers: Opt for high-quality steel or nylon rollers with the correct diameter and shaft length for your garage door.
- Wrench or Socket Set: You’ll use these for loosening track brackets and other hardware.
- Screwdrivers (Flat-Head and Phillips): You’ll use them to remove bolts or prying open track edges carefully.
- Pliers: These will help you hold nuts in place or pulling out old pins.
- Clamps: Utilize them to secure the door in place while you swap out rollers.
- Step Ladder: You’ll need it to reach rollers near the top of the door safely.
- Protective Gloves and Glasses: Preventing accidental cuts or debris from hitting your eyes is always a good idea.
- Lubricant: Apply a silicone-based garage door lubricant to keep new rollers moving smoothly. Avoid greases that attract dirt.
- A Working Partner (Optional): Garage doors can be heavy and difficult to maneuver alone, especially for first-timers. You will also need an experienced working partner to replace the garage door panel.
With these recommendations, you’ll be able to carry out the process. Additionally, it’s advisable to take some minutes to organize your workspace to cut the risk of accidents and hindrances.
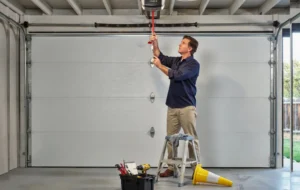
How to Replace Garage Door Rollers: Step-by-Step Instruction to Replacing Garage Door Rollers
If you’ve been searching for a thorough walkthrough on how to replace garage door rollers, you’re in the right place. Below, we’ll overview is a simple method to ensure a smooth, secure replacement. Remember, roller replacement habitually involves dealing with a heavy door under spring tension, so make your safety a priority throughout the entire process. Let’s get into it!

Step 1: Disconnect the Power and Secure the Door
- Unplug the Opener: First of all, unplug the automatic garage door opener to avoid any triggers.
- Open the Door Manually: Use the emergency release cord (usually a red handle) and disengage the door from the opener.
- Secure the Door: Lift the door to a height that’s comfortable for you to work and place clamps on the tracks just below the door to keep it from moving down while you work.

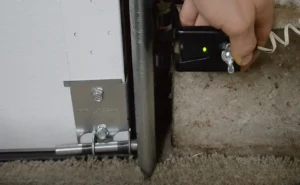
Step 2: Take away Old Rollers
- Locate the Roller Brackets: Each roller fits into a bracket attached to the door panel.
- Loosen Brackets or Track Bolts: Depending on your door, you might have to slightly loosen the track’s edge or remove a bracket bolt to wiggle out the old roller.
- Slide Out the Roller: Softly pry the roller from the track, careful not to bend the metal. The old roller should slide out from the bracket easily once freed.

Step 3: Check the Track and Hinges
- Look for Debris: Clean the dust or grime that’s accumulated in the track.
- Look for Bends or Damage: If the track is dented or misaligned, this is the ideal moment to fix those issues. A rubber mallet can sometimes help straighten minor bends.
- Examine Hinges and Fasteners: Make sure all bolts are tight and hinges aren’t cracked. Replacing worn hinges now could save you from a future second repair.

Step 4: Insert the New Roller
- Align the Roller Shaft: Place the new roller so that its shaft lines up with the bracket hole.
- Slide the Roller In: Cautiously maneuver the roller wheel back into the track while guiding the shaft into the bracket.
- Re-Secure the Bracket or Track: Tighten bolts or bracket screws. Ensure it’s secure but avoid over-torquing as this can strip threads.

Step 5: Lubricate and Test
- Lubricate: Spray a silicone-based lubricant on the new rollers to minimize friction. Additionally, we have a guide on how to regularly use lubricant on your garage door, which you can check out, and we hope you find it useful.
- Release the Door: Remove the clamps and lower the door very slowly, observing roller movement.
- Reconnect the Opener: Plug the opener back in and do a test run. Pay attention and seek for any rare sights or sounds. The door should glide effortlessly without trembling or excessive noise.
Repeat the same procedure for each roller until you replaced them all. If you did it correctly, the door will open and close quietly and smoothly. Regularly performing inspections in the future will help prevent sudden roller failure and everything will keep running optimally.
Common Mistakes to Avoid When Replacing Rollers
Even if you’ve read about garage door issues and know the basics, it’s easy to make mistakes during a DIY project. Here are some to watch out for and avoid:
1st Mistake to Avoid: Neglecting Safety Precautions
Not unplugging the opener or securing the door can result in unexpected and abrupt movements that may cause injuries. Always lock the door in place before removing any roller brackets.
2nd Mistake to Avoid: Choosing the Wrong Rollers
Not all rollers are created equal. The consequence of using rollers that are too small, big, or have the wrong stem length will be poor performance and augmented wear.
3rd Mistake to Avoid: Overlooking Track Alignment
If the track is already bent or misaligned, simply installing new rollers won’t fix the core problem. Always inspect and correct track issues before completing the replacement.
4th Mistake to Avoid: Neglecting Lubrication
A dry track produces friction and this wears down even the best rollers quickly. Keep them properly lubricated from the start.
5th Mistake to Avoid: Over-Tightening Screws
Excessively tight bolts can warp brackets or strip threading. Be firm but moderate in your torque.
Avoiding these errors saves you headaches, time, money, and likely safety hazards. A bit of caution today will preserve the door’s functionality and overall condition.
The Benefits of Replacing Garage Door Rollers
Spending the effort to learn how to replace garage door rollers implies much more than avoiding squeaks and jams. It brings a range of advantages you’ll appreciate every time you press the opener button:

Smoother Operation
New rollers glide seamlessly along the tracks, reducing friction and rattling. This smoother travel diminishes tension on other door components too.
Reduced Noise
If your current rollers are old or in unproper conditions, they can cause a noteworthy racket. Upgrading them can eliminate those squeaks and grinding sounds, providing a quieter environment—great if you have rooms adjacent to the garage.
Enhanced Door Longevity
Worn rollers can add unnecessary stress on the door tracks, hinges, and opener. By replacing them, you safeguard these other components and most likely extend the overall life of your door system.
More Safety
Damaged rollers could cause the door to come off track at an inopportune moment. Keeping rollers in good shape ensures the door remains stable and predictable, diminishing injury risks.
Elevated Home Value and Curb Appeal
A smoothly operating, quiet garage door talks about your property’s maintenance status. It’s one of those behind-the-scenes upgrades that can impress likely buyers.
Although some benefits, like quieter operation, are immediately observable others become evident over time. If you keep records of your expenses, you’ll notice that you’ll spend less on emergency repairs and enjoy a reliable garage door for many years.
Cost of Replacing Garage Door Rollers
Considering the garage door roller replacement cost can seem a bit overwhelming, in reality, this is one of the most affordable garage door preservation tasks. The final price will depend on the type of rollers you choose, labor costs if you hire a professional, and any additional repairs needed:
Summary Table of Garage Door Roller Repair Costs
| Item/Service | Description | Estimated Cost |
| DIY Roller Costs | ||
| Standard Steel Rollers | A pack of 10 or 12 rollers. | $20 – $40 |
| High-end Nylon Rollers | A complete set of rollers. | $40 – $60 |
| Professional Labor | ||
| Technician Fee | Cost for expert installation, varying by location and door type. | $50 – $150 |
| Associated Repairs | ||
| Track/Hinge Issues | Extra costs for repairing bent tracks or broken brackets. | $20 – $100+ |
Detailed Cost Spending of Garage Door Roller Repair
DIY Roller Costs: A set of standard steel rollers can cost from $20 to $40 for a pack of 10 or 12. High-end nylon rollers can go from $40 to $60 per set.
Professional Labor: If you choose to hire a technician, labor fees may run anywhere from $50 to $150, depending on your location and door type. Although it adds to the total amount, you obtain the benefit of expert installation.
Associated Repairs: If your track or hinges are also in bad shape, you’ll may have to pay these extra costs. Bent tracks or broken brackets can increase the bill by $20 to $100 or more.
Roller replacement remains an advisable investment for preventing bigger, more expensive garage door issues over time. By doing it yourself, you save on technician’s fees. However, if you’re uneasy about handling the door’s weight or identifying tricky track problems, professional service will be well worth the added expense.
Maintenance Tips to Extend Roller Lifespan
After you’ve learned how to replace garage door rollers, ongoing care becomes vital to preserve the rollers and the overall functioning of your garage door. These garage door tips will help keep your new rollers in shape, so you don’t find yourself having to replace them again too soon:
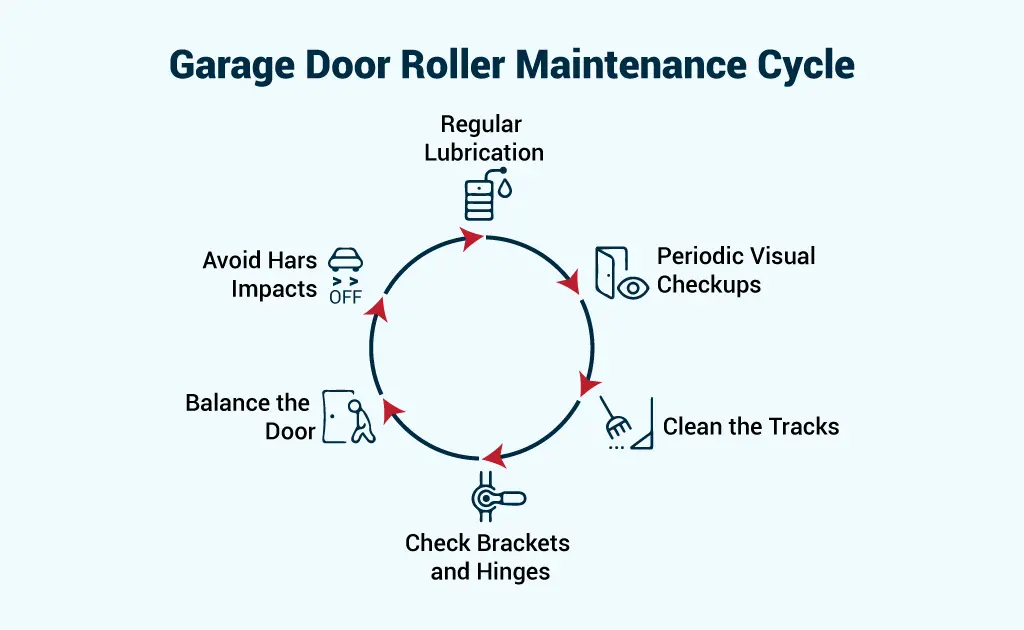
Tip No. 1: Regular Lubrication: Apply a silicone-based garage door lubricant to rollers, hinges, and tracks every six months or so. Avoid thick greases that can attract dust and debris.
Tip No. 2: Periodic Visual Checkups: Pay attention to your door. Once or twice a month watch and listen to your door as it opens and closes. Look for unusual sounds, movements, or misalignment. Catching small problems early is preferable than having to deal with bigger and more expensive issues.
Tip No. 3: Clean the Tracks: Dust, leaves, and spider webs accumulate astonishingly fast. Wipe down the tracks every few months to keep roller movement unobstructed.
Tip No. 4: Check Brackets and Hinges: Confirm all garage door hardware is snug but not overly tight. Loose bolts cause rattling, and overtightened bolts warp the door’s components.
Tip No. 5: Balance Your Door: Sporadically test the balance of the door. To do so, disconnect it from the opener and manually move it halfway up. If it stays put, this means the springs are balanced. If it drops or lifts on its own, you’ll have no choice than to ask a professional for spring adjustment.
Tip No. 6: Avoid Harsh Impacts: Bouncing your door with a vehicle or storing heavy items against it can bend tracks, knock rollers out of alignment, or damage panels. Keep the area around your door as clear as possible.
These simple strategies are all you need to maximize roller functioning and minimize the occurrence of expensive repairs. Even the best rollers will eventually wear out, but consistent maintenance guarantees you get the most from them.

When to Call a Professional
While replacing rollers is often easy to do for many DIY fans, there are scenarios where it’s wise to contact an experienced technician:
| Symptom / Reason | What Will You Do? |
| Severe Track Damage | If you see large dents, deep bends, or misalignment that simple tools can’t fix, a professional can estimate whether you need repairs or a full replacement. |
| Spring or Cable Issues | Dealing with torsion springs or lift cables is hazardous due to the high tension. If you suspect a spring or cable problem, call a pro immediately for safety. |
| Chronic Door Misalignment | If your door repeatedly slides off track, shakes violently, or jammed rollers reoccur soon after replacement, a deeper mechanical problem might be at play. |
| Time Constraints | Sometimes you simply don’t have the time or inclination to do it yourself. A professional can replace rollers quickly and spot other issues in one go. |
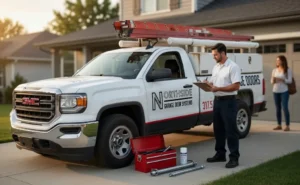
While a DIY approach is often great, knowing your limits with tough or dangerous garage door problems is key to responsible home maintenance, saving you from bigger expenses and unsafe situations. If you’re facing a job that requires expert help, call Northside Garage Door Systems (317) 575-0983 or book a service for a reliable and quick response to get it handled safely!
FAQs About Garage Door Roller Replacement
Is it worth replacing garage door rollers?
Yes, it is. New rollers make your garage door run smoother, quieter, and safer. Worn-out rollers can put extra strain on the opener and tracks, which can lead to bigger, more expensive problems later. Replacing them is a small investment that helps your door last longer.
How do I know if my rollers are bad?
You’ll usually notice loud grinding or squeaking noises, the door may shake as it moves, or it might get stuck or move unevenly. If the rollers look cracked, chipped, or worn down, it’s time to replace them.
How often should garage door rollers be replaced?
On average, rollers should be replaced every 7 to 10 years. If your garage door is used very often, they may wear out sooner and need replacing earlier.
Can you spray WD-40 on garage door rollers?
It’s not a good idea to use WD-40 because it’s more of a cleaner than a long-lasting lubricant. Instead, use a silicone-based or lithium-based garage door lubricant, which keeps the rollers moving smoothly and prevents rust.
How long do garage door rollers last?
Plastic rollers usually last about 2 to 3 years, steel rollers about 5 to 7 years, and nylon rollers can last 10 years or more with proper care. The lifespan depends on how often you use your garage door and how well you maintain it.
Is it safe to replace the bottom roller on a garage door yourself?
The bottom roller is connected to the garage door cable, which is under heavy tension. Trying to replace it yourself can be dangerous. It’s best to leave the bottom roller replacement to a professional to avoid injury.
What are the best replacement garage door rollers?
Nylon rollers are often considered the best because they are quiet, durable, and require less maintenance compared to steel or plastic rollers. If you want long-lasting performance and less noise, nylon rollers are the top choice.
Final Thoughts
A smooth, quiet garage door isn’t a luxury—it’s a major convenience that preserves the safety and comfort of your home. Worn rollers can lead to irritating noises, alignment troubles, and even dangerous failures if ignored. Thankfully, understanding how to replace garage door rollers makes it easier to preserve your door’s performance and lifecycle.
You learned the process and trust your skills, then you are ready to spot early warning signs, gather the right garage door tools, and carefully follow a step-by-step approach to upgrade your rollers in a single afternoon. Regular maintenance afterward—like lubrication, cleaning the tracks, and checking fasteners—ensures that your investment pays off for years. And if you ever run into tougher mechanical issues or simply prefer expert assistance, professionals are just a call away.
Ultimately, well-functioning rollers do more than just reduce noise—they protect the integrity of the entire garage door system. Whether you’re doing a quick DIY swap or scheduling a routine inspection, giving attention to your door rollers is a smart way to keep your home secure, efficient, and free from inconvenient breakdowns.