Your garage door opener lets you open your garage door without having to step out of the car, which is very convenient. In this LiftMaster garage door opener troubleshooting, we’ll see the most common LiftMaster opener problems homeowners in Central Indiana face, and quick fixes you can try yourself.
You’ll also learn when it’s safer to call a technician.
If you’re in a hurry, this LiftMaster troubleshooting guide, will help you solve many issues in less than a minute. Many issues are caused by a power, basic settings, safety sensors, or a LiftMaster learn button not properly programed.
Fast checks:
- Verify the opener is firmly plugged in and the outlet works. Unplug the opener and test it with another device.
- If the outlet has no power, reset the breaker or GFCI (Ground Fault Circuit Interrupter), then plug the opener back in.
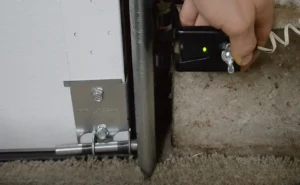
- Look at the sensor LEDs near the floor; both should be solid, not blinking. (This could be due to sensors’ misalignment or a physical obstruction).
- Stand closer to the garage door, keep the remote away from metal, and try again.
If you’re in Lebanon, or the greater Indianapolis area and the door still doesn’t move, it may be time to call Northside Garage Door Systems at 317-575-0983 for same day assistance.
Lights Blinking? LiftMaster Error Meanings
Blinking lights or arrow LEDs and beeps are built-in diagnostic. Learning the main LiftMaster blinking light codes and LiftMaster error codes and decide if it’s a quick DIY fix, or time to call a pro.
| Error Code | Blink / Beep Pattern* | Likely Cause | Quick Action Step |
|---|---|---|---|
| 1-1 3-5 4-6 | Main light flashes 10 times | Safety reversing sensors blocked, misaligned, or sensor wiring issue | Clear the beam, wipe sensor lenses, realign the sensors until LEDs are solid. If the problem remains, inspect the sensor wiring for loose or damaged connections. |
| 1-1 | Up arrow 1 blink / Down arrow 1 blink | Safety sensors obstructed or wiring issues | Clear obstructions, inspect sensor wiring for loose or damaged connections. |
| 1-2 | Up arrow 1 / Down arrow 2 | Sensor wires reversed or shorted | Check the terminals, correct reverse wiring, replace damaged cables. |
| 1-4 | Up arrow 1 / Down arrow 4 | Safety sensors misaligned or brief beam obstruction. | Realign the sensors so both LEDs are steady, remove any object in the beam, test again. |
| 1-5 | Up arrow 1 / Down arrow 5 | No RPM signal at start of movement (motor/speed sensor) | Disconnect the opener and check that the door moves smoothly by hand. Fix any binding or heavy-door issues. If the code returns, call a technician |
| 1-6 | Jackshaft (8500/8500W/98022) red service LED flashing | Wall-mount diagnostic fault sensor, travel, lock, or cable issue) | Turn wall-lock off, check cable tension and sensor, follow your model’s chart or call a pro. |
For more details, check Liftmaster’s Diagnostic Codes for Garage Door Openers.
Important note: Depending on the model, there might be variations. Always check your owner’s manual, LiftMaster online support library, or ask your trusted pro.
myQ and Jackshaft Beeps (What They Usually Mean and What to Do)
myQ – Alert2Close Beeps:
Beeping and flashing before the door closes from the app or a timer is a warning, not a fault. This is normal, simply check the doorway is clear.
myQ – Door sensor/hub beeps and the app shows “Low Battery”:
Replace the coin-cell battery, reattach the sensor and open and close the door a few times .
Battery backup beeps:
- Beeps every 2 seconds and shows solid orange LED: running only on battery
- Beeps every 30 seconds and shows a flickering orange LED: low battery.
- Beeps every 30 seconds and shows a solid red LED: dead battery.
Check the outlet, if it has power, replace the backup battery.
Jackshaft beeps and show red Service LED: This (8500,8500W/98022) means there’s a fault on the opener (sensors, travel, lock, or cable tension).
Garage Door Won’t Close or Reverse Midway
When a garage door won’t close or keeps reversing, the usual causes are:
- Safety sensors are misaligned, obstructed, or dirty
- Door out of balance or binding in the tracks
- Broken or weakened springs
- Damaged tracks, rollers, or hinges are damaged.
Why your LiftMaster opener causes this
LiftMaster openers check two things:
- The safety sensor circuit (The Protector System)
- The force and travel needed to move the door
When the sensors don’t detect a clear opening, or the opener feels the door is heavy or off track, it will stop or reverse the door.
How to fix this on your LiftMaster opener
Step 1: Check the safety sensors. Their lights should be solid, not flashing. Clean the lenses, re-aim the brackets. If the lights don’t stay on, check the sensor wires and terminals.
Step 2: Test the door balance manually. Pull the release handle and lift the door halfway carefully. If it feels too heavy, jerky, or drops, call a technician. It’s most like a hardware or springs issue, not the opener.
Step 3: Inspect tracks and rollers. Clean debris, tighten loose brackets, and look for cracked rollers or a bent track. For major bending or misaligned tracks, call a pro.
Step 4: Adjust the travel limits to set the door’s height and the force setting. Use the travel/force controls on your motor head.
If the door still won’t close or keeps reversing, schedule a service so a professional can check the opener and the entire garage door system.

Garage Door Remote or Keypad Not Working
If you find you LiftMaster remote not working but the wall control still works, the issue is generally simple: batteries, programming, or interference.
Step 1: Check batteries and lock mode
Make sure to the “Lock” on the wall control is off. Then change the remote or keypad battery and test again. Weak coin-cell batteries can affect operation.

Step 2: Reprogram the remote with the “Learn” button
Most LiftMaster openers have a yellow (newer models), purple, or red/orange button “Learn” button on the motor head.
- Press and release the button. The LED turns on and stays solid for about 30 seconds.
- Withing that window, press and hold the remote button until the opener light blinks or you hear a click.
- If time runs out, press “Learn” again and repeat.
For more guidance and visuals, visit our guide on “How to Reset Garage Remote”.
Step 3: Fix signal interference (LED bulbs, metal cabinets, routers)
Your remote and opener communicate through a radio signal. Interference can be caused by:
- LED bulbs in the opener that aren’t “garage-door safe”
- Metal cabinets or shelves near the motor
- Nearby Wi-Fi routers or access points.
Try these quick fixes:
- Use only LED bulbs labeled as garage-door-compatible
- Stand closer to the door and hold the remote in view of the opener
- Move your routers and access points farther from the opener
If the wall button works well, but the remote is inconsistent, interference is most likely the reason.
Step 4: Basic LiftMaster keypad troubleshooting and setup
For a LiftMaster keypad troubleshooting, start changing the battery and then:
- Press and release the “Learn” button on the motor.
- Within that programming window, go to the keypad, enter a new PIN, and hold “Enter” until the opener light blinks or you hear a click.
- Test the PIN from different distances to confirm consistent functioning.
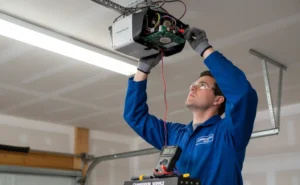
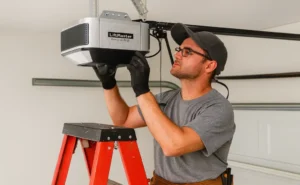
LiftMaster Garage Door Opener Model-Specific Fixes
Wall-mount and ceiling-mount openers are different, so LiftMaster 8500 troubleshooting and 98022 focus on specific checks.

LiftMaster 8500/ 8500W
- Ensure any side lock or manual deadbolt is fully unlocked, otherwise this can produce errors and stop the motor from running.
- Check the torsion cable on the drums: it must be tight and evenly wrapped. Wall-mount systems rely on proper cable tension to work safely.
- If you notice sensor blink codes, recheck photo-eyes and firing. If the codes suggest travel errors, run a travel re-learn only once the door moves gently by hand.

LiftMaster 98022 (Elite DC wall-mount)
- Verify the outlet has power, and if you have a backup battery, ensure it’s not drained. Replace the battery if your unit shows battery error beeps or LEDs.
- After changing springs, cables, or door sections, re do the open/close travel learn so your 98022 understands the new door balance.
Chain-drive and belt-drive units (ceiling mount)
- Noise or vibration issues? Chain drives are louder but a loose chain can slap the rail. Tighten it slightly. A belt drive that’s too loose can slip, while a too tight one strains the motor.
- Tighten the mounting hardware and secure the header bracket.
- Add or adjust anti-vibration mounting straps if the opener shakes the ceiling.
- Learn more about Belt vs. Chain drive openers at our informative article.
Garage Door Noise, Grinding, or Stopping Under Load
Loud grinding, rattling, or a door that stops halfway usually means the hardware or drive system is struggling. Friction, worn parts, or a binding door can put strain on the opener, while bad LiftMaster sensor alignment can stop or reverse the door.
Lubrication: Reduces friction and helps realize if there’s noise coming from the opener or the door itself. Use garage-door-rated spray on springs, hinges, and rollers.
Worn gears or sprockets: If your opener grinds while the chain or belt barely moves, you may have damaged internal drive gear or sprocket. If you find plastic shaves or metal dust on the opener, stop using it and call for service.
Belt or chain tension: A loose chain will slap the rail, and a chain or belt that’s too tight can strain the motor. With the tension adjustment nut near the trolley, make small changes, following the manual, and test after each tweak.
Once you lubricated and checked the tension, recheck your LiftMaster sensor alignment. Apart from the Liftmaster, the Genie garage door opener is another popular option. We have a detailed guide on troubleshooting this Genie garage door opener that you can check out if you want.
Printable Checklist
When dealing with a garage door opener issue, it’s common to skip a step. A simple garage door maintenance checklist helps you stay organized, track what you’ve already tried, and remember seasonal tasks like safety sensor cleaning or lubrication.
Print the checklist, keep it handy, and use it for regular checks or maintenance.
Click the button below and download your 1-page PDF checklist and keep your LiftMaster opener on track!
Frequently Asked Questions (FAQs)
Why won’t my LiftMaster garage door close?
Most of the time it’s a safety sensor issue. Make sure both sensor LEDs are solid, clean the lenses and verify nothing is blocking the door.
How do I reset my LiftMaster opener?
Press and hold the “Learn” button on the motor for a few seconds until the LED turns off. This clears all remotes and keypads, so you’ll have to reprogram them
How long does a LiftMaster opener last?
With proper installation and maintenance, they generally last 10 -15 years; sometimes longer if there’s no heavy usage.
Why is my LiftMaster opener beeping?
Usually, beeping a few seconds or every 30 seconds indicates a back-up battery or power issue.
What can I safely fix myself?
Usual DIY fixes include handling batteries, programming the remote or keypad, doing basic LiftMaster sensor alignment, and applying lubrication.
When to Call a Technician for Help
There are some issues you can safely solve yourself, yet others can damage your system or injure you. It’s time to call a technician when:
- The door feels excessively heavy, or crocked.
- The door won’t stay halfway open by hand.
- You find loose or broken springs, or snapped and frayed cables.
- The opener makes grinding noises, smells odd, or keeps stopping with the same error code after you tried basic fixes.
- The door jammed partway and you’re afraid it might fall.
Homeowners in Lebanon, Indianapolis, Greenwood and surrounding areas trust Northside Garage Door Systems and their trusted local team for repairs, replacements, or maintenance.
If you live in Indiana, you count on a team of pros that have been operating in the area for decades. For same day service, free estimates, and 24/7 support, we are there for you.
For a reliable LiftMaster garage door opener troubleshooting, call us at 317-575-0983, get a free quote, and give yourself the peace of mind you deserve.