Programming your LiftMaster garage door opener is an important task that ensures the smooth operation and security of your garage door system. Whether you’ve just installed a new opener or need to sync a new remote, understanding how to program a LiftMaster garage door opener is the key to maintaining control over your garage’s access. LiftMaster garage door openers are among the most reliable and widely used on the market, offering features that enhance convenience and security for homeowners.
Knowing how to program a LiftMaster garage door opener not only allows you to customize your garage access but also helps in situations where you need to reset or reprogram the system due to changes in your home’s security needs. By following a few simple steps, you can ensure that your garage door opener is properly programmed, giving you peace of mind and easy access to your home.
A LiftMaster garage door opener is a high-quality, reliable device designed to automate the opening and closing of your garage door. Known for their durability and advanced technology, LiftMaster openers are a popular choice among homeowners for enhancing both convenience and security. These openers come with a range of features, including rolling code technology, which changes the code each time the remote is used, ensuring that only your remote can access the garage. Additionally, many LiftMaster models are compatible with smart home systems, allowing you to control your garage door from your smartphone or other devices.

Understanding how to program a LiftMaster garage door opener is important for several reasons. First, it enables you to sync new remotes or keypads to your opener, ensuring that you have the access you need. Second, knowing how to program your opener is essential for maintaining security, especially if you’ve moved into a new home or if one of your remotes has been lost or stolen. Programming your LiftMaster opener correctly ensures that your garage door responds only to the remotes you’ve authorized, keeping your home secure.
By learning how to program a LiftMaster garage door opener, you gain control over who can access your garage, and you ensure that your system operates properly. This knowledge is not only practical for daily use but also essential for troubleshooting any issues that may arise with your garage door opener.
Preparing to Program LiftMaster Opener
Before you begin to program your LiftMaster garage door opener, it’s important to take a few steps to ensure a smooth and successful process. Proper preparation will save you time and help avoid common issues that can arise during programming.
Gather Necessary Tools
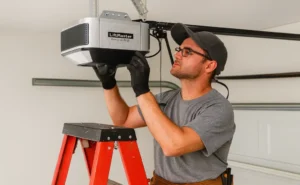
First, make sure you have all the tools you’ll need. Generally, you won’t need much beyond the LiftMaster garage door opener remote and the opener unit itself. However, it’s a good idea to have a ladder handy so you can easily reach the opener, as well as a small flashlight to see the buttons and controls clearly. Also, if your remote or opener requires any programming instructions, having those materials on hand will be helpful.
Find the Learn Button (Yellow, Purple, Red, or Green)
The first and most critical step is to find the Learn Button on your garage door opener unit. Its location and color depend on the model, but it is typically on the back or side of the motor unit, near the antenna wire.
- Yellow Learn Button: Found on most modern openers (Security+ 2.0).
- Purple Learn Button: Used on openers made from 2005 to 2014 (Security+ 315 MHz).
- Red/Orange Learn Button: Found on older models from 1993 to 2005 (Security+ 390 MHz).
- Green Learn Button: Used on models made before 1993 (Billion Code).
Read the Manual
Before you start, it’s essential to read the user manual for your LiftMaster garage door opener. The manual provides specific instructions and safety precautions that are tailored to your model. It will guide you through the process and help you understand the functions of the different buttons and indicators on the opener. If you’ve misplaced the manual, you can often find a digital copy on the LiftMaster website by entering your model number.
Check Power Connections
Ensure that the LiftMaster garage door opener is properly connected to power. The opener should be plugged into a working outlet, and you should verify that there are no loose or frayed wires. A steady power supply is crucial for successful programming. If the unit isn’t receiving power, the programming process won’t work, so it’s important to address any power issues before proceeding.

How to Program a LiftMaster Garage Door Opener: Step-by-Step Guide
Programming your LiftMaster garage door opener is a straightforward process that can be completed in just a few steps. Whether you’re setting up a new remote or keypad, following this guide will help you ensure that your system is functioning correctly and securely. Below, we’ll walk you through each step of how to program a LiftMaster garage door opener.
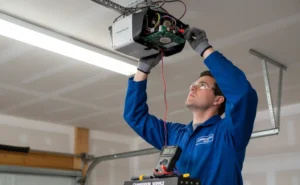
Step 1: Locate the Learn Button
The first step in how to program a LiftMaster garage door opener is to find the Learn button on your garage door opener unit. The Learn button is typically located on the back or side of the opener, near the antenna wire. Depending on the model, the button may be red, yellow, green, or purple, and it may be hidden under a small panel. This button is essential for programming your remote or keypad, so identifying it correctly is crucial.
Step 2: Press the Learn Button Once
Once you’ve located the Learn button, you’re ready for the next step in how to program a LiftMaster garage door opener. Press and hold the Learn button for about 1-3 seconds to until the indicator light next to it turns on. The light might blink or stay steady depending on your model, indicating that the opener is in programming mode. Be sure not to hold the button too long, as this could erase all previous programming.
Step 3: Program the Remote or Keypad
Now that your opener is in programming mode, it’s time to program the remote or keypad. Within 30 seconds of pressing the Learn button, press the button on the remote or enter the code on the keypad that you want to program. The indicator light on the garage door opener should blink or turn off, signaling that the programming has been successful. If you’re programming a keypad, ensure you press the enter button after inputting your desired code.

Step 4: Test the Programming
The final step in how to program a LiftMaster garage door opener is to test the newly programmed remote or keypad. Stand at a safe distance and press the button on the remote or enter the code on the keypad to see if the garage door responds. If the door opens or closes as expected, your programming was successful. If not, repeat the steps above, ensuring each action is performed correctly.
How to Program a LiftMaster Remotes or Keypads (Step-by-step)
If you need to add more remotes or keypads to your LiftMaster garage door opener remote program, the process is straightforward and similar to programming the first remote. Remember, if you can maintain your garage door remote and opener, you can keep your garage door opener for a long time. We have a post guide on this topic that you can read if you want. Here’s how you can do it:
Before you start:
Make sure your garage door is closed and you have the remote you want to program. You will need a ladder to reach the opener unit.
Step 1: Locate the Learn Button
As with any programming step in how to program a LiftMaster garage door opener, the first step is to locate the Learn button on your garage door opener. This button is usually found on the back or side of the opener unit, near the antenna wire. The color of the button may vary depending on your model.
Step 2: Press the Learn Button
Once you’ve found the Learn button, press and release it quickly. You don’t need to hold it down as you would when clearing the memory. Pressing it puts the opener into a mode where it’s ready to receive the signal from an additional remote or keypad.
Step 3: Program the New Remote or Keypad
Within 30 seconds of pressing the Learn button, take the new remote or keypad you want to add to the LiftMaster garage door opener remote program. For remotes, press and hold the button you want to use until the opener’s lights flash or the LED on the opener blinks, indicating successful programming. For keypads, enter your desired code and then press the enter button. Again, the blinking lights will confirm that the programming was successful.

Step 4: Test the New Device
After programming, test the new remote or keypad by pressing the button or entering the code while standing at a safe distance from the garage door. The door should respond by opening or closing, confirming that the device has been correctly added to the LiftMaster garage door opener remote program.
Troubleshooting: If the remote doesn’t work, repeat the process. Ensure you are within range and have fresh batteries in the remote.
Reprogramming or Factory Resetting the Garage Door Opener
There may come a time when you need to reprogram your LiftMaster garage door opener or perform a factory reset. This could be necessary if you’ve lost a remote, moved into a new home, or simply want to update your security settings. Here’s how to approach both reprogramming and factory resetting your opener.
Reprogramming LiftMaster Garage Door Opener
To reprogram your LiftMaster garage door opener, follow these steps:
- Step 1: Locate the Learn Button: The first step in reprogramming LiftMaster garage door opener is to locate the Learn button on your opener unit. This button is typically on the back or side of the motor unit, near the antenna wire.
- Step 2: Press and Hold the Learn Button: Press and hold the Learn button until the indicator light turns on, which usually takes about 6 seconds. This puts the opener into programming mode, allowing you to sync a new remote or keypad.
- Step 3: Program the New Device: After pressing the Learn button, you have 30 seconds to press the button on the remote or enter the code on the keypad that you wish to program. The opener’s light will blink, indicating that the reprogramming was successful.
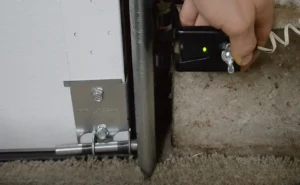
How to Program an Outside Keypad (Change/Reset PIN)
Programming an external keypad is a great way to provide keyless access. You can set a secure code, and if you need to change the garage door code for your family members, you can also do so.
- Step 1: Press and quickly release the Learn Button on your opener.
- Step 2: Within 30 seconds, enter a 4-digit PIN on the keypad, then press and hold the Enter or # button.
- Step 3: Release the button when the opener’s lights flash or you hear a click. This confirms the new PIN has been accepted.
- Step 4: Test the keypad by entering your new PIN. The garage door should respond.
How to Program a LiftMaster to Your Car (HomeLink)
Programming your opener to your car’s built-in HomeLink system requires a few extra steps.
- Step 1: Press and hold the two outer HomeLink buttons in your car until the indicator light begins to flash. This clears any previous programming.
- Step 2: Press and hold the HomeLink button you want to program and the desired remote button at the same time. The HomeLink light will flash slowly, then rapidly when successful.
- Step 3: Go to your garage door opener unit. Press and quickly release the Learn Button.
- Step 4: Within 30 seconds, return to your car and press the programmed HomeLink button three times. The opener lights should flash, indicating that the pairing is complete.
Factory Resetting: How to Reset/Erase All Codes LiftMaster Garage Door Opener (Clear Memory)
A factory reset is a more comprehensive process that clears all programmed remotes and keypads from the opener’s memory, returning it to its original settings.
- Step 1: Press and Hold the Learn Button: To perform a factory reset, press and hold the Learn button on your LiftMaster opener for about 10 seconds. The indicator light will go out, signaling that the opener’s memory has been completely cleared. This means all previously programmed remotes and keypads will no longer function.
- Step 2: Reprogram Your Devices: After the reset, you’ll need to reprogram your LiftMaster garage door opener from scratch, as none of the previous settings will be retained. Follow the standard reprogramming steps to sync your remotes and keypads.

Clearing All Remotes From Opener’s Memory
There are times when you may need to clear your LiftMaster garage door opener of all previously programmed remotes. This action is typically necessary if you’ve lost a remote, moved into a new home, or want to enhance your home’s security by ensuring that no unauthorized remotes can access your garage. Clearing the memory will erase all existing remotes, requiring you to reprogram the ones you still use.
Steps to Clear LiftMaster Garage Door Opener Memory
- Locate the Learn Button: To begin, you’ll need to locate the Learn button on your LiftMaster garage door opener. This button is usually found on the back or side of the motor unit, near the antenna wire. It might be labeled differently depending on the model, but it is often a red, yellow, green, or purple button.
- Press and Hold the Learn Button: To clear the LiftMaster garage door opener of all previously programmed remotes, press and hold the Learn button for about 10 seconds. You’ll notice that the indicator light next to the button will turn off, signaling that the opener’s memory has been erased. This means that none of the previously programmed remotes will work with your garage door anymore.
- Reprogram Your Remotes: After clearing the memory, you’ll need to reprogram any remotes or keypads you still wish to use. Follow the steps outlined in how to program a LiftMaster garage door opener to sync your devices back to the opener.
Why and When to Clear the Memory
Clearing the memory of your LiftMaster garage door opener is an important step in maintaining the security of your garage. It’s particularly useful if you’ve lost a remote, as it prevents anyone who might find it from gaining access to your garage. Additionally, if you’ve moved into a new home and are unsure how many remotes are in circulation, clearing the memory gives you a fresh start, allowing you to program only the remotes you trust.
By knowing how to program a LiftMaster garage door opener and when to clear its memory, you can ensure that your garage remains secure and that only authorized remotes have access.
Maintenance Tips for LiftMaster Garage Door Opener
Proper maintenance of your LiftMaster garage door opener is essential to ensure it operates smoothly and lasts for years. Regular upkeep not only prevents unexpected breakdowns but also ensures your opener performs at its best. Here are some important LiftMaster gate opener maintenance tips to keep your system in top shape.
1. Regularly Inspect the Hardware
One of the simplest but most effective LiftMaster opener maintenance tasks is to inspect all the hardware. Check the tracks, rollers, and hinges for any signs of wear or damage. Tighten any loose bolts or screws and ensure that all moving parts are properly lubricated. This helps reduce friction and prevents unnecessary strain on the opener.

2. Lubricate Moving Parts
Lubrication is a crucial part of LiftMaster gate opener maintenance. Apply a silicone-based lubricant to the rollers, hinges, and tracks at least twice a year. This will keep the door moving smoothly and reduce the noise during operation. Avoid using grease or thick oils, as they can attract dust and debris, leading to buildup and operational issues.
3. Test the Safety Features
Your LiftMaster garage door opener is equipped with safety features like auto-reverse and photo-eye sensors. Regularly test these features to ensure they are working correctly. Place an object in the door’s path to see if it reverses upon contact, and clean the photo-eye sensors to prevent any obstruction that might affect their function.
4. Check the Balance of the Door
A properly balanced garage door is critical for the longevity of your opener. Disconnect the opener by pulling the release handle and manually lift the door halfway. If it stays in place, the door is balanced. If it moves up or down, the balance needs adjustment, which is a task best left to a professional.
5. Keep the Opener Unit Clean
Dust and debris can accumulate on the opener unit, affecting its performance. Wipe down the exterior of the unit and ensure that the motor and other components are free from dust. This simple step in LiftMaster opener maintenance can go a long way in preventing overheating and extending the life of your opener.
By following these LiftMaster gate opener maintenance tips, you can ensure that your garage door opener remains in excellent working condition. Regular maintenance combined with knowing how to program a LiftMaster garage door opener will keep your system running smoothly for years to come.
FAQs (Frequently Asked Questions)
How do I program a LiftMaster garage door opener?
You can program a LiftMaster opener by pressing the Learn button on the motor unit and then the button on your remote or keypad within 30 seconds.
Where is the Learn button on a LiftMaster?
The Learn button is located on the back or side of the motor unit, near the antenna wire. It is typically yellow, purple, red/orange, or green.
How do I pair my garage door remote?
To pair your remote, press and release the Learn button, then press and hold your remote button until the lights on the opener flash.
How to reset a LiftMaster garage door opener?
To reset your opener, press and hold the Learn button for 10 seconds until the indicator light turns off.
What color Learn button do I have?
The color of your Learn button depends on the model and age of your opener. The most common colors are yellow (latest), purple, red/orange, and green (oldest).
Final Thoughts on How to Program and Maintain Your LiftMaster Garage Door Opener
Programming and maintaining your LiftMaster garage door opener is essential for ensuring the security and smooth operation of your garage door. Throughout this guide, we’ve covered everything you need to know about how to program LiftMaster garage door opener, from preparing your system and programming remotes to performing resets and regular maintenance. By following these steps, you can easily manage your LiftMaster opener, ensuring it works properly and securely. Regular maintenance and proper programming are key to extending the life of your garage door opener and keeping your home safe.
Understanding how to program a LiftMaster garage door opener not only simplifies your day-to-day use but also enhances the overall security of your home. Whether you’re adding new remotes, reprogramming existing ones, or performing a factory reset, the knowledge and steps provided in this guide will help you maintain full control over your garage door system with confidence.