Sometimes we forget the decisive role of that small device: the garage door opener battery. It’s decisive in the adequate functioning of your garage door system. Finding yourself stuck outside, under the rain, after a long work day, pressing your unresponsive remote will certainly make you wish you knew how to change battery in a garage door opener. Without a dependable battery the correct functioning of your garage is at risk. It may be a handheld remote, a wall-mounted keypad, or an opener unit with a backup power source, regardless of the type knowing how to change them will prevent you from upsetting moments.
Today, we’ll discuss the “must-knows” about identifying, replacing, and maintaining the batteries in your garage door system. Definitely, it’s better to prevent than having inconvenient, door-jamming moments in the future.
Understanding Your Garage Door Opener Battery System
When talking about garage door opener batteries, it’s important to bear in mind that there can be several batteries supporting a single garage door system:
Remote Control Battery
This battery is typically small, and may look like a button or coin, like a CR2032 or a small cylindrical battery (AA or AAA). If your garage door doesn’t respond to the remote, usually it’s because the remote battery is dead. So check that before panicking that something worse is happening.

Keypad Battery
Some garage door systems have a keypad. These keypads are usually installed outside your garage door. These keypads characteristically use a 9V battery or a couple of AA batteries. The main advantage of these keypads is that users don’t need a key to enter their garage, they just need to type a code. If the keypad doesn’t light or respond when you enter your code, the keypad battery is most likely the reason why.
Opener Unit Backup Battery
Newer garage door opener models, such as those from the liftmaster garage door opener brand, commonly come with a backup battery in the main unit. This backup battery comes into action when there’s a power outage, so you can still open and close the door. Yet, their life cycle is limited, over time they lose the capability of holding a charge, thus needing to be replaced every now and then.
Each battery has a different purpose. Understanding those purposes is a precondition for successful troubleshooting. For example, if your wall-mounted keypad doesn’t work but the remote does, you’ll correctly suspect that the keypad battery is at fault. However, if the whole system doesn’t work at all during a power outage, most likely the backup battery is in need for a replacement.
Basically, having a grasp of garage door opener batteries will be of much help, you be able to identify the right area for diagnosis and replacement. Additionally, each battery may have a different lifespan, so it’s a good idea to keep track of how often you need to replace them before they fail again.
Tools and Materials Needed for Change Garage Door Opener Battery

Don’t rush into your garage door opener battery replacement. First, make sure have all the tools and materials you might need:
Replacement Batteries
Identify the correct battery type for your remote, keypad, or opener unit. The most common ones are CR2032, 9V rectangular batteries, AA or AAA batteries, and there are also specific backup batteries designed for certain opener brands.
Screwdrivers
A small Phillips or flathead screwdriver will be enough to open the battery compartment in the remote or keypad. Sometimes, the main unit also requires removing a cover panel.
Protective Gloves (Optional)
While this is not mandatory, gloves can protect your hands from getting in contact with battery corrosion, if present.
Clean Cloth
Dirt, dust, or corrosion can interfere with battery contacts. Softly wipe down the contact area before inserting the new ones.
Owner’s Manual
If you still have your garage door opener manual, keep it handy. Some models have varying battery compartment locations and special instructions for installation or resets.
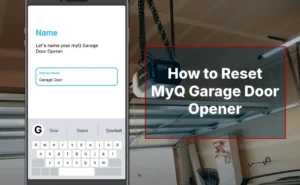
For instance, if you have a MyQ system, knowing how to reset myq garage door opener can be crucial after a battery change.

Keeping these items handy allows you to complete your garage door opener battery replacement efficiently, without having to rush to the closest store to buy the materials you need to finish your work.
How to Change Battery in Garage Door Opener: Step-by-Step Guide (Remote, Keypad, Opener Unit)
Properly knowing how to change battery in a garage door opener depends on which part of the system needs attention.
Below, we’ll take a look at the three main components: the handheld remote, the wall-mounted keypad, and the backup battery in the opener unit.
It doesn’t matter if you are replacing a garage door opener remote control battery or a garage door opener keypad battery, the process is equally simple once you locate the correct compartment and follow a few steps and safety tips.
1. How to Change Garage Door Remote Control Battery
- Step 1: Try to locate a small slot or screw on the back or side of the remote. Some remotes have a sliding panel to access the battery, while others require a tiny Phillips screwdriver.
- Step 2: If there’s a screw, remove it carefully. If it’s a sliding cover, press or slide it to expose the battery area.
- Step 3: Take away the old battery using your fingernail or a small flat tool. Note the battery’s orientation—the positive (+) side typically faces up or away from the circuit board.
- Step 4: Place the new battery and double-check the polarity to match the old one.
- Step 5: Screw the compartment cover back on or slide. To test the remote just press any button to confirm the door responds. If it doesn’t, you may need to reset garage door remote.
2. How to Change Garage Door Keypad Battery
- Step 1: Gently pull open or flip the keypad cover. On many keypads, the battery is hidden behind a small panel or plastic enclosure.
- Step 2: Some keypads have a tiny screw securing the battery compartment. Remove it with a Phillips screwdriver.
- Step 3: Keypads usually use 9V rectangular batteries or AA batteries. Remove the old battery.
- Step 4: Connect or place a new battery of the same voltage and size. Confirm the terminals align with the correct polarity as indicated.
- Step 5: Replace the retaining screw if needed. Close the cover and test by entering your usual code. If the keypad lights up and the door operates, the garage door opener keypad battery replacement was a success.
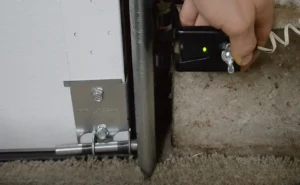
3. How to Change Garage Door Opener Unit Backup Battery
- Step 1: Take care of your personal security first and unplug the garage door opener from the outlet to prevent any accidental activation while you work.
- Step 2: Many opener units have a backup battery compartment on the back or side. You might need to remove a small cover panel secured with screws.
- Step 3: Disconnect any leads or wires attached to the battery. Pay attention to their arrangement; just in case you forget it, take a photo.
- Step 4: Place the new battery in the compartment, reconnecting the leads in the correct orientation. Ensure the positive and negative terminals are matched properly.
- Step 5: Screw the cover panel back in place. Plug the opener back into its power source. Test the system by opening and closing the garage door to confirm everything is working normally.
By following these steps, you’ll easily learn how to change battery in garage door . Keep in mind that each manufacturer may have small variations, so in case of doubts, refer to your owner’s manual for the specific details that apply to your model.
How to Change Liftmaster and Genie Garage Door Openers Battery and Keypads
Below is a detailed discussion of how to change the battery and keypad battery of your Liftmaster and Genie garage door opener.
How to Replace Battery in a LiftMaster Remote
- Step 1: Slide the battery cover off the remote.
- Step 2: Remove the old remote battery (usually a CR2032 coin cell).
- Step 3: Insert a new CR2032 battery, with the “+” side facing up.
- Step 4: Close the cover securely.
- Step 5: Test the remote to confirm the garage door opener battery replacement worked.
How to Change Battery in a LiftMaster Keypad
- Step 1: Open the keypad cover.
- Step 2: Remove the screw at the bottom to access the garage door keypad battery.
- Step 3: Replace the old battery (commonly a 9V).
- Step 4: Reattach the cover and test the keypad.

How to Replace Battery in a Genie Remote
- Step 1: Open the remote’s battery compartment.
- Step 2: Remove the old garage door opener remote battery (usually a CR2032 or A23, depending on the model).
- Step 3: Insert the new battery with correct polarity.
- Step 4: Snap the cover back on and test the opener.
How to Change Battery in a Genie Keypad
- Step 1: Slide the keypad faceplate down to access the battery slot.
- Step 2: Remove the old keypad battery (often a 9V).
- Step 3: Insert a new 9V battery.
- Step 4: Replace the cover and test the keypad.
Troubleshooting Common Issues After Battery Replacement
Sometimes, issues may persist even after you change battery in garage door opener. Let’s overview some common problems that may arise after battery replacement and how you can address them:
Remote or Keypad Don’t Respond
Solution: Double-check the polarity of the battery. Ensure that the new battery is correctly installed, and all the contacts are clean. If your remote still doesn’t work, you may need to reprogram or reset the remote to the opener unit according to your manual’s instructions.

Inconsistent or Weak Signal
Solution: If the garage door only responds sporadically, the battery might be fine, but the antenna on the opener unit could be misaligned or obstructed. Relocate the opener’s antenna or verify it’s not damaged. Also, check the remote for any signs of damage to the internal circuitry.
Keypad Not Lighting Up
Solution: If you’ve replaced the battery and the keypad still doesn’t light up, check if there’s corrosion on the battery contacts. Rubbing alcohol on a cotton swab might clean any residue.
Door Not Operating During Power Outage
Solution: If you just installed a new backup battery but the door still doesn’t move when the power is out, verify that the backup battery leads are connected correctly. Some opener units require a specific reset procedure to activate the backup function.
Door Only Moves a Few Inches and Stops
Solution: This could indicate a mechanical problem. Check the garage door tracks, rollers, and springs for obstructions or wear. If you don’t find any obstructions or signs of wear, it would be call to go for a professional inspection. For examples of common issues, see the Genie garage door opener’s troubleshooting guides.
Review these troubleshooting tips after you change battery in garage door opener, and you’ll be able to identify if the problem lies with the battery installation or if there’s a different underlying issue.
Preventative Maintenance and Battery Life Extension Tips
Why prevention and maintenance are so important? Think about this: you don’t want to stay stuck outside or locked in. This can be prevented with proper maintenance. Additionally, you can extend your garage door keypad battery life and the durability of all batteries involved. Let’s see a few useful preventive maintenance tips:
Check Your Batteries Regularly
Don’t wait until your remote or keypad completely fails. Once a month do this easy test: open and close the garage door at various distances. If you notice decreased range or slower responses, this might be unveiling it’s time to change the battery preemptively.
Keep All Clean
Dirt and dust can collect on battery contacts and circuit boards, reducing the dependability of your devices. Use a soft fabric to remove debris from the remote, keypad, and opener unit.
Take Care of the Remotes
Don’t leave your remote exposed to extreme temperatures. The battery’s capacity diminishes rapidly under extreme conditions, reducing its lifespan.

Control the Backup Battery Once a Year
If your opener has a built-in backup battery, test it at least once a year by unplugging the unit to simulate a power outage. If the door operates smoothly on battery power, you’re good to go. If not, replace the battery promptly.
Schedule Professional Check-ups
A yearly or biannual tune-up from a certified technician can detect worn components that put unnecessary tension on your system. When mechanical parts operate efficiently, your batteries don’t have to work as hard, helping to preserve garage door keypad battery life and other power reserves.
Knowing how to change battery in garage door opener is important, yet preventative care ensures both the mechanical and electrical aspects of your garage door system work properly. Don’t overlook maintenance even if you already know you to change the batteries in your garage door opener.
When to Call a Professional
Despite knowing how to change battery in garage door, some situations require the assistance of professional expertise:
Persistent Electrical Problems
Despite knowing how to change battery in garage door, some situations require the assistance of professional expertise:
Physical Damage on Remotes or Keypads
Dropping a remote or keypad into the water, exposing it to physical impacts, or seeing significant corrosion often requires a replacement. Professionals can gauge whether repairs are feasible or cost-effective.
Complex Opener Unit Errors
Modern garage door openers may exhibit error codes on a small LED screen or flashing lights. Sometimes these indicate a failure in the motor, safety sensors, or internal drive system. Technicians can understand what these codes mean.
Check Your Warranty
If your opener is still under warranty, certain do-it-yourself fixes might cancel the agreement. So if your warranty is still valid, don’t risk its validity by attempting to fix the issue yourself. Calling the manufacturer or an official service provider can safeguard your warranty.
Safety Concerns with Springs or Cables
While battery replacements are relatively simple, tasks involving torsion springs, cables, or the door’s structural components can be dangerous. If your door is stuck, making strange noises, or seems to be off-balance, a professional inspection is strongly recommended to prevent injuries.
Professional support ensures that your garage door works correctly, is in good condition and also improves the door’s overall durability and integrity.
")
FAQs About Garage Door Opener Battery Replacement
How do I replace the battery in my garage door opener remote?
To replace the battery, slide open the remote cover, remove the old garage door opener remote battery (usually CR2032 or A23), insert a new one, and snap the cover back on. Test the remote to ensure it works.
What kind of battery does a LiftMaster remote use?
Most LiftMaster garage door opener remotes use a CR2032 coin cell battery. Some older models may use a 12V (A23). Always check your manual or look at the existing battery before replacement.
How do I change the battery in my garage door keypad?
Open the keypad cover, unscrew the bottom panel if required, and replace the garage door keypad battery (commonly a 9V). Reattach the cover and test the keypad for proper function.
How often should I replace my garage door opener battery?
A garage door opener battery replacement is typically needed every 1–2 years, depending on usage and battery type. If your remote or keypad starts losing range or becomes unresponsive, it’s time to replace the battery.
Why isn’t my garage door opener working after replacing the battery?
If your opener doesn’t work after inserting a new remote battery, check that the battery is installed correctly. For keypads, you may need to reprogram it. Also, make sure the opener itself is powered and the remote is within range.
Conclusion
Knowing how to change battery in garage door is an essential skill for homeowners looking to maintain a secure and functional garage. After, a garage is not only a place where you store your belongings, in most cases it’s also a direct access to your home’s privacy and family security. From the small garage door opener battery inside your handheld remote to the 9V unit powering your keypad or the backup battery inside the opener itself, each is a key player. By following the recommended steps for battery selection, removal, and installation, you can restore the functionality if your remote or keypad runs out of energy.
Equally important is ongoing care: keep your remote clean, avoid putting it close to temperatures (like a freezer or an oven), and set regular inspections for your entire garage door system. These simple measures extend the life of garage door opener batteries while minimalizing unforeseen failures. If troubleshooting doesn’t resolve persistent or unusual problems, don’t neglect to consult a professional right away. Sometimes, deeper mechanical or electrical issues masquerade as battery-related troubles.
Remember, a little anticipatory care helps preserve garage door keypad battery life and ensures your garage door operates smoothly—even when the power goes out. Paying attention and being proactive will allow you to know when and how to change battery in garage door opener on a predictable schedule is way better than facing surprises at the worst possible moment.
So, the following time you notice bad performance or a non-responsive remote, you’ll know exactly how to change battery in garage door opener and keep your garage accessible and protected. You are prepared to ensure that your garage door remains a reliable entry point for you, your family, and your guests.