If your garage door suddenly stops closing and the warning lights of the opener start to flash, it’s often a sign that you need a garage door sensor replacement. These small photo-eye sensors are a crucial safety feature. They’re typically located a few inches above the floor on either side of the track, creating an invisible infrared light beam across the garage door opening.
If anything—a pet, a bike, or even a foot—breaks this beam, the door automatically reverses to prevent accidents. When the sensors fail, this vital safety system is compromised.
This guide will walk you through the importance of these sensors, how to tell when they need to be replaced, and a step-by-step process for doing the job yourself. A DIY replacement will only cost you $25 to $80, plus about an hour of your time. If you opt for a professional replacement, expect to pay $120 to $230, which often includes a full safety check of your door system.
Let’s start with how you can replace the garage door sensor and the total cost of garage door sensor replacement is discussed in detail below:
What is a Garage Door Sensor and Why It Matters
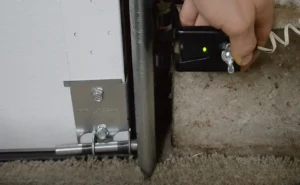
Garage door safety sensors are infrared photo-electric “eyes” that work in pairs. They are usually installed 4 to 6 inches above the floor: one sends a light beam; the other one receives it. If something interrupts that infrared light while the door is closing, the opener’s motor stops closing and reverses.
A Closer Look at How Photo Eye Sensor Works
Each photo eye sensor has a small infrared LED emitter on one side of the doorway and a matching receiver on the opposite side. A low voltage of about 24 V bell wire fuels both units. The opener looks for a continuous electronic loop formed by that infrared beam. Any interference may lead the opener to take it as a signal that something is blocking the door.
Vibration, dirt, or corrosion on the circuit board, for example, can weaken the signal. That’s why cleaning or realigning them can frequently fix false reversals.
Besides preventing injuries to people and pets, or pressing down a vehicle, the sensors also protect the door and opener from damage as it saves the door panels, tracks, and opener motor from excessive force.
The importance of photo eye sensors is such that since 1993, the USA federal law requires all new residential opener to include them. The U.S Consumer Product Safety Commission set a mandatory standard for automatic domestic garage-door openers. This mandate (16CRF part 1211) applies to all units manufactured on or after January 1, 1993.
Quick facts:
- If the sensor is shining steadily (green or amber), it means the two photo eye sensors are correctly aligned.
- If the light is flashing, it indicates that the sensors are unaligned or there’s something faulty inside them.
- Usual motives behind false trips include: sunlight glare, grime, vibration, or loose wiring.
- Inside the plastic case there’s a delicate circuit board that can be negatively affected by moisture and power surges.

When to Replace Your Garage Door Sensor
If you have a minor misalignment, you can fix it easy. However, replacing garage door sensors will be necessary when simple troubleshooting as cleaning, tightening, or realigning the sensors don’t restore the solid, steady lights (LEDs).
Symptoms to watch for and never ignore:
- The garage door reverses right after you hit the close command.
- The opener’s light flash 10 times or more.
- One of the sensor’s LED still appears dark even if the lenses are clean.
- If the garage door gives you trouble only on humid mornings, it’s probably because the moisture got inside the sensor and caused corrosion.
Knowing how garage sensors work will help you realize that a continuous electrical loop exists between the two “eyes” and the opener’s board.
Although a malfunctioning garage door can be very annoying, instead of directly jumping to replacement, try these basic troubleshooting steps, especially if the issue is intermittent, not steady.
Basic troubleshooting before replacement:
- Look for obstructions. Some debris or even a small leaf can interrupt the invisible beam. Inspect in detail if there are any physical obstructions in the sensor lenses or the area between them.
- Clean the lenses. Wipe the lenses of both sensors with a soft cloth. An accumulation of dust or grime can be the reason behind malfunctions.
- Check the wiring. See if there are any frayed, cut, or disconnected wires. Loose connections are a common cause of intermittent photo eye sensor failures.
- See if there’s sunlight glare. If direct sunlight reaches the receiving sensor, this can interfere with the infrared beam, mainly at certain times of the day. Create a small shade over the receiving sensor with cardboard or plastic and see if that solves the issue.
Expert tip: If you assess the sensor wires with a multi-meter and it shows there’s no connection, the sensor’s lifespan came to an end, and you should replace it.
How Much Does Garage Door Sensor Replacement Cost in 2025?

To decide if you do the repair yourself or need to hire a professional, it’s necessary to know the garage door sensor replacement cost beforehand.
1. Item cost:
- DIY price range (universal sensor kit pair): $25 to $ 45
- Brand-specific sensor pair (LiftMaster, Genie, etc.): $45 to $ 8
2. Labor cost:
- Do it yourself: None
- Professional service: $75 to $150 (brand sensor kit included)
3. Service call/travel:
- Do it yourself: None
- Professional service $40 to $80
Summarizing costs:
- A complete DIY will cost you between $25 – $80 plus an hour of your time.
- A full professional replacement will cost you between $120 – $230, and usually includes a quick safety check of the whole door system.
It’s imperative to know that these costs are estimates that can vary depending on numerous factors. For instance, labor costs (if you hire a pro) may vary from state to state. Additionally, the brand of the garage door opener often affects the cost of the replacement sensor kit. Specific sensors for certain brands will be more expensive than universal kits.

Step-by-Step Guide for Garage Door Sensor Replacement
If you decided to do it yourself, here’s the detailed process on how to replace garage door sensor.
Before getting your hands on it, make sure you have the tools you’ll need:
- a Nr. 2Phillips screwdriver,
- a 4-foot level,
- zip ties,
- wire strippers,
- a ladder and
- the new sensor kit.
Now that you are fully equipped to complete the task and replace your garage door sensor, just follow each of the steps above!
Step 1. Disconnect the power
Unplug the opener or flip the breaker to avoid shock or any unexpected movement.
Step 2. Loosen and label your sensor wires
Take a photo of the wires so you don’t forget where each one goes. Typically, the white one is the common wire, and the white with a black stripe is the signal wire.
Step 3. Remove the old sensors
Take the old sensors out of the brackets. While doing so, check if the lenses look foggy, cloudy, and if the plastic cases are cracked.
Step 4. Attach the new sensors
Match the wire colors, twist them together with wire nuts, and lightly tighten the bracket screws with your hand.

Step 5. Align the sensors
Point the two photo sensor eyes straight at each other, across the tracks.
Step 6. Turn the power back on and adjust
The indicator lights (LEDs) should not blink. Nudge the sensors until their lights become solid and then tighten the screws.
Step 7. Check the safety reverse
Close the door and wave a broom through the beam. If everything is correct, the door should stop and reverse right away.
Step 8. Dispose of the old sensors responsibly
Open the plastic shells and drop the circuit boards at an e-waste-specific site.
Expert Tip: If a light still blinks after you lined everything, recheck that no wires are crossed, or replace any damaged low-voltage cable.
DIY vs Hiring a Garage Door Technician
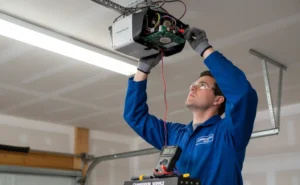
If a garage sensor not working warning persists, particularly after you replaced the sensors, the error can be in hidden wiring, connector pins inside the opener, or the logic opener boards. So, it may be time to seek a professional garage door sensor repair. Consider that a professional will use diagnostic tools most homeowners don’t have.
Here’s where North Side Garage Door Systems can be your best ally to solve your problem without unnecessary waiting time and absolute professionalism.
Why Choose North Side Garage Door Systems

North Side’s licensed technician will arrive to your place with brand-specific spare parts, replace your sensors in less than an hour, run a comprehensive safety check, and back their work with a warranty. Within a few seconds you can book the visit filling their contact form (where you can set your preferred days and time frame, and even upload a photo of the issue you are facing.). For immediate personal assistance, call (317) 575-0983 and schedule your appointment in the moment.
Maintenance Tips to Extend Sensor Life
There are some tips and tricks for aligning garage door sensors easily, without incurring in high costs, and that can save you from having to do an early replacement. We are pleased to share them with you:
- Dust them once a week. This simple habit will prevent grime or spider webs from blocking the beam.
- Tighten the brackets every few months. Bear in mind that normal door vibration can loosen the screws.
- Block harsh sunlight. With just a small piece of cardboard or plastic shade, you can prevent false trips.
- Keep the wires protected. For example, you can run the low-voltage cable inside a conduit to keep rodents from chewing it.
- Invest a few dollars in surge protection. A $15 plug-in suppressor protects the opener from lightning hits.
- Perform a monthly check up. Put a 2 x 4 inches construction lumber under the door, and press “close” it should reverse immediately.
- Clean and dry the sensor lenses. Road salt and de-icing brine can obstruct the sensor lenses. Clean and dry them after every snowstorm.
These tips are a win-win; spend a few minutes applying these tips, and you’ll minimize sensor errors, headaches, or service calls. The adoption of good maintenance habits can extend the lifecycle of your garage door sensors and prevent eventual malfunctions.
Conclusion
Having a balky garage door is frustrating, and it’s also a red flag to your safety. Prompt garage door sensor replacement keeps your family and pets safe, and protects the expensive motor of the opener in its best condition. You can decide to do it yourself and spend $25 to $80, or hire a pro and spend $150 to $ 200.
Don’t neglect the steps and tips we shared above, and beware when you need to call North Side to enjoy a garage door that closes gently and safely. Something as simple as a small infrared beam can bring you peace of mind every time you press the remote.